AmebaアプリのiOS版を担当している田坂(@tasanobu)です。
先日、iOS7のデザインに最適化したバージョンをストアにリリースしました。
今回はiOS7対応時に行ったUI実装をご紹介させて頂きます。
1. NavigationBarやToolbarがコンテンツに被ってしまう問題
また、デフォルトではStatusBarやNavigationBar、Toolbarなどは透過になり、バーの下部の領域までアプリのコンテンツが表示される変更が加えられました。
| Before | After |

|

|
UIViewController.edgesForExtendedLayoutというviewのレイアウト調整用プロパティの値をviewDidLoadで変更することにより解決しています。
// iOS7の場合
if( [UIDevice currentDevice].systemVersion.floatValue >= 7.0f )
{
self.edgesForExtendedLayout = UIRectEdgeNone;
}
また、以下のようにNavigationBarとToolbarのtranslucentを変更しても同様の動作をするようです。(正しい実装かは怪しいですが。。。)
self.navigationController.toolbar.translucent = NO;
self.navigationController.navigationBar.translucent = NO;
2. StatusBarがコンテンツに被ってしまう問題
NavigationBarを表示しない場合、"1"の対応を入れてもStatusBarがviewに被ってしまいます。
| Before | After |

|

|
この場合、UIViewController.topLayoutGuideの値を参照し、viewDidLayoutSubviewsでveiwのframeを調整することにより解決しています。
// StatusBarのBottomの値をviewのOffsetとして使う
CGFloat topOffset = self.topLayoutGuide.length;
// Offset値からViewのframeを調整
CGRect rect = self.view.frame;
rect.size.height = rect.size.height - topOffset;
rect.origin.y = rect.origin.y + topOffset;
self.view.frame = rect;
3. UINavigationBarのtintColor設定
iOS7からUINavigationBarやUIToolbarなどのtintColorの仕様が以下のように変わっています。
| iOS7 | iOS6 |
|---|---|
|
tintColorはbarButtonItemの色を指定。 barTintColorでbarの背景色を指定。 |
tintColorでbarの背景色を指定。 |
AppDelegate の application:didFinishLaunchingWithOptions: でNavigationBarの背景色設定などをiOS7とそれ以前に分けて行っています。
(UIAppearanceを利用してアプリケーション全体に設定を反映させています。)
// NavigationBarの背景色
UIColor* barBaseColor = [UIColor whiteColor];
if( [UIDevice currentDevice].systemVersion.floatValue >= 7.0f )
{
// NavigationBarの背景色指定
[[UINavigationBar appearance] setBarTintColor:barBaseColor];
// BarButtonItemのデフォルト色指定
[[UINavigationBar appearance] setTintColor:[UIColor greenColor]];
}
else
{
[[UINavigationBar appearance] setTintColor:barBaseColor];
}
4. UITableViewのSeparator設定
iOS7からのデフォルトでは、Separatorは左端より若干内側から引かれるようになりました。| Before | After |

|

|
AmebaアプリではSeparatorを左端まで引くデザインを採用しています。
AppDelegate の application:didFinishLaunchingWithOptions: でUITableView.separatorInsetの値を設定しています。
("3"と同様、UIAppearanceを利用してアプリケーション全体に設定を反映させています。)
// iOS7の場合
if( [UIDevice currentDevice].systemVersion.floatValue >= 7.0f )
{
[UITableView appearance].separatorInset = UIEdgeInsetsZero;
}
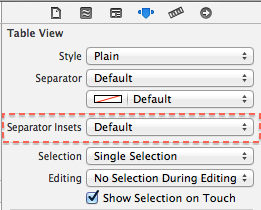
なお、UITableView.separatorInsetの調整はInterface Builderでも可能です。
Interface Builderを利用する場合、以下のように"Separator Insets"のリストボックスを"Default"から"Custom"に切り替え、Leftの値を"0"に変更します。
| Before | After |

|
 |
5. UIImagePickerControllerのカメラに電池残量が表示されてしまう問題
UIImagePickerControllerのカメラをモーダル表示すると、StatusBarの表示が残ってしまいます。 Stack Overflowでも同じ問題に苦しんでいる人がいるようでした。Info.plistにUIViewControllerBasedStatusBarAppearanceキーを追加し、値にNOを設定することで対応しています。
まとめ
AmebaアプリでiOS7対応時に行ったUI実装をご紹介させて頂きました。開発環境をXcode5に移行した際、多くのアプリで上記のような対応が必要になってくると思います。ベストプラクティスではないかもしれませんが、これからiOS7対応をされる方の参考になれば幸いです。
参考情報
対応期間中はAppleから公開されている iOS7 UI Transition Guide を何度も読み返しました。UIKitの各種クラスにおけるiOS7とiOS6の違いなどが網羅的にまとめられており、新UIの考え方や実装方法の理解を深めるのにとても役立ちました。
iOS7対応を始める前に、ご一読することをお勧めします。
- Apple iOS 7 UI Transition Guide
